|
CB
ATHLETIC CONSULTING TRAINING REPORT -
www.cbathletics.com
|
| |
ISSUE
#75 - "The Deadlift: 1 Exercise, 18 Variations"
INSIDE
THIS ISSUE...
-
"What's so great about this exercise?"
- "Conventional vs. Sumo"
- "SLDL vs. RDL"
- "The Suitcase & the Staircase"
- "Miscellaneous Deadlifts"
- "Deadlifts for Grip Strength"
1
- WHY DEADLIFT?
If
you want to be strong in as many aspects of life and sport
as possible, and you only had one exercise to choose, the
deadlift would definitely a candidate for top dog. It doesn't
isolate a specific muscle group, however it uses many muscles
in a movement that is similar to everyday tasks (such as
picking up heavy objects from the ground). Overall, the
deadlift demands a lot of effort from a lot of muscles.
In fact, the biggest decision isn't whether to do deadlifts,
but when in your training to do deadlifts.
There
are many styles of deadlifts, each with a greater emphasize
on certain muscle groups over another. Aside from this benefit,
having such a great variation from one exercise allows you
to keep your training programs fresh. All deadlifts are
great because they stress the hip and knee extensors, spinal
erectors, abdominals, upper back, forearms, and even biceps.
This article will highlight the emphasis of specific deadlifts
on performance and muscle adaptations.
One
of greatest things about this exercise is that if you can
deadlift 500lbs, chances are you can curl a lot of weight,
even if you've never done a curl before. However, if you
can curl 60lbs, there are no guarantees that you can even
deadlift a sack of cement off the ground! Deadlifting is
something that develops "dad" strength, also known
as the ability to lift odd heavy objects from the ground
into the back of a pick-up truck. Check out www.purepowermag.com/live/live.html
for some extraordinary deadlifting pictures. Now that is
"dad" strength!
Basically,
deadlifting should help increase your low-back strength
and thus improve safety in everyday lifting tasks. You will
get stronger and learn to use better lifting technique so
that you won't get injured during handyman jobs or when
moving. Highly skilled lifters learn to keep the bar close
to the body to reduce the risk of injury and increase performance.
One
note of caution, only non-injured individuals should deadlift.
These exercises are safe and effective for most people provided
you use correct form and the proper resistance. If you can
pick up an object off the ground without trouble, then chances
are you can safely perform all of the variations of the
deadlift. If you have any concerns about your lower-back
area, flexibility or technique, avoid this exercise until
given approval from your physical therapist or doctor.
When
beginning a new exercise, always start with a light weight
and make sure to emphasize perfect form (just as you should
with all new exercises). Deadlifts can serve as a warm-up
exercise prior to easier leg and back exercises until you
perfect your technique. Then you can move on to heavier
weights and work sets. It is also best to have a CSCS (Certified
Strength and Conditioning Specialist) teach you the exercise
and analyze your technique.
Once
you get into heavier deadlifting, you may choose to use
the options of a strap or a belt. Your decision to use these
implements will depend on your training goals and the intensity
at which you train. Straps provide an alternative to developing
grip strength and thus make up for a weak grip and can allow
greater loads to be lifted. For a bodybuilder, this is important
because it will enable more stress to be applied to the
rest of the working muscles. By all means, if you are deadlifting
for the purpose of bodybuilding, you may incorporate straps
into your heaviest sets of deadlifts.
In
contrast, if you are training simply to become the strongest
guy on your construction worksite, straps aren't going to
do you any good, unless you want to be wearing them around
the job site. Straps are not unsafe and are simply a tool
on which lifters should keep an open mind. Furthermore,
if you get into competition, don't expect to be granted
the use of straps when it's your turn to compete.
As
mentioned in the description of many of these deadlifts
below, the alternate grip does allow for some compensation
on the limitations of a weak grip. Make sure to switch your
alternative grip regularly to avoid developing imbalances.
In fact, try to use an overhand grip in all sets that don't
demand the alternative grip.
The
weight belt provides similar assistance and suffers from
the same problem. There is some debate on whether a belt
is the safest way to lift and whether or not it allows you
to lift more weight, however most experts agree that if
you lift heavy with a belt, it is best that you do not attempt
to lift heavy without the belt. If you choose to incorporate
the belt into your training, at least do the warm-up sets
and moderate weight sets without the belt.
2
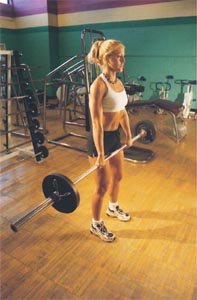
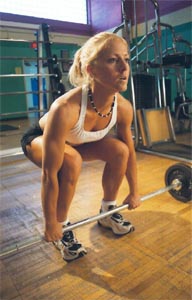
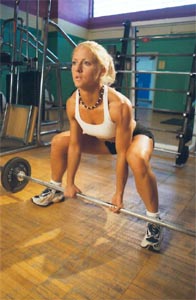
- THE CONVENTIONAL & SUMO DEADLIFTS
Conventional
style deadlifting reflects the most common method of picking
something up off of the floor. Similarly, the sumo deadlift
is another good method of lifting heavy weight, and that
is why both of these are used in competition by powerlifters
seeking to lift the most "kilos" possible.
Conventional
style deadlifting may also be referred to as the "full
deadlift from the floor". With this exercise you will
as previously mentioned, train just about every pulling
muscle from your head to your toe, plus your quadriceps,
abdominals, and maybe even your triceps. The conventional
lift is almost the perfect total body exercise, and pretty
much the only areas that miss out are the groin and the
chest, but the conventional deadlift stresses the lower
back more than the sumo deadlift. Here is the step-by-step
technique for the conventional deadlift (#'s 1 & 2):
The
sumo deadlift is a little different and puts stress on the
groin musculature (hip adductors) in addition to all of
the other muscle groups stressed by the conventional deadlift.
For athletes, the importance of hip adductor strength and
preparation was addressed in detail in ISSUE #74. Some lifters
also consider the sumo lift to be safer because its wider
stance allows for a more upright torso and thus less stress
on the lower back. In addition, this stance often allows
the athlete to lift more weight (because of the shorter
movement distance in this exercise). Here is the step-by-step
technique for the sumo deadlift (#'s 3 & 4):
 |
Load
the bar with the appropriate weight plates and place
it on the floor |
|
Stand
with your feet at least 6 inches wider than shoulder
width and stand behind the bar (keep the bar close to
your shins) |
|
Squat
behind the bar and grasp it with your hands about shoulder-width
apart |
|
You
can grip the bar with an overhand grip (palms down)
or an "alternate" grip (one palm down and
one palm up). The alternate, medium grip allows for
heavier loads to be lifted without being limited by
grip strength |
|
To
begin the movement, push through your glutes, hamstrings,
and groin. Push out to the sides allowing you to stand
up and bring your thighs together |
|
Pull
slightly with your arms but keep your torso as upright
as possible and squeeze the shoulder blades together
throughout the movement |
|
Continue to hold the weight at arm's length throughout
the entire movement. Keep the bar very close to the
body and your heels on the floor |
|
Exhale
as you near the top of the movement |
|
Pause
briefly at the top of the movement and then begin to
lower the weight by flexing the hips and knees (as you
would during the descent of a squat) |
|
Keep
the bar close to your body and lower it under control
to the floor. This completes one repetition |
|
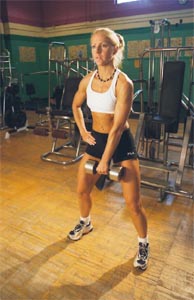
The
sumo deadlift can also be done with a single dumbbell
held between your legs |
3
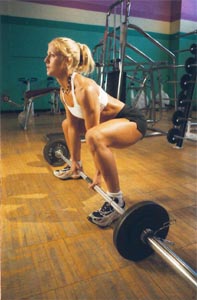
- SLDL & RDL: WHAT THE L?
Next
we come to another pair of deadlifts that are quite similar,
the straight-leg (stiff-leg) deadlift (SLDL) and the Romanian
deadlift (RDL). Many people often assume they are one in
the same, however there is a small difference in technique.
Regardless
of this difference, which will be explained shortly, both
exercises are incredibly powerful and specialized for strengthening
the hip extensor muscles. These two deadlifts really stress
the lower back, glutes (buttocks), and hamstrings, and thus
they are great exercises for sprinters. In the SLDL, all
the movement occurs about the hip joints and the knees remain
stationary in just a slightly bent position. Here is the
step-by-step technique for the SLDL (#'s 5 & 6):
|
Load
the bar with the appropriate weight plates |
|
Stand
with your feet shoulder-width apart and begin with the
bar held at thigh level with a medium grip |
|
You
can grip the bar with an overhand grip (palms down)
or an "alternate" grip (one palm down and
one palm up). The alternate, medium grip allows for
heavier loads to be lifted without being limited by
grip strength |
|
With
a very slight bend in the knees and flat back, begin
the movement by bending at the hips. Lower your upper
body as far as possible while keeping your back straight.
Keep the bar under control as it is lowered |
|
The
bar will be lowered straight down and may move slightly
out and away from the legs as the hips flex. The bar
should end directly below the shoulders. Because the
bar moves away from the body, this puts a greater torque
on the lower back. Keep that in mind if there are any
safety concerns for the low back area |
|
Focus
on lowering the bar down by bending at the hips, not
at the knees. Your knees do not move (therefore referred
to as "stiff-" or "straight-legged") |
|
Keep
your spine neutral, no excessive flexion or extension
(according to lower-back experts). Keep the shoulders
back |
|
The
Range of Motion (ROM) of this exercise depends on the
flexibility of the lifter. Reverse the motion before
form becomes compromised (this may not be far if you
are inflexible) |
|
Pull
slightly with your arms and upper back. Keep your back
"neutral" (flat) and squeeze the shoulder
blades together throughout the movement |
|
Continue
to keep the back flat and elbows fully extended as you
stand up |
|
Exhale
as you near the top of the movement |
|
Pause
briefly at the top of the movement and then begin to
lower the weight. This completes one repetition |
|
The
SLDL can also be done with dumbbells and is an excellent
exercise for lifters with excellent flexibility and
advanced technique |
One
strength coach made this distinction between the SLDL and
RDL: "The main difference is that in the RDL you only
go as far as possible while keeping an arch in the lower
back. In an SLDL - you can go a little further." During
an RDL, this coach puts one hand on the lower back of a
client and one on the top of their glutes (buttocks), making
sure the hands touch one another. If the hands separate
during the movement then the athlete must end the ROM (range
of motion) in the RDL (#7).
Thus,
the RDL is simply a shortened version of SLDL and is used
when the lifter wants to reduce the stress on the lower
back. The ROM about the hip joints is shortened and more
weight can be utilized because of this mechanical advantage
(plus the fact that the bar is kept closer to the body).
This is exercise is to have originated from a Romanian weightlifting
coach that was breaking down an Olympic lift into multiple
movements. As with the Olympic lifts, a focus of the RDL
is to keep the bar as close to the body as possible. This
is the step-by-step RDL technique:
|
Load
the bar with the appropriate weight plates |
|
Stand
with your feet shoulder-width apart and begin with the
bar held at thigh level with a medium, overhand grip |
|
Upon
descending, slightly flex your knees and keep your back
flat |
|
Flex
the torso forward and lower the bar slowly and under
control. Keep the bar as close to the body as possible.
Keep your chest "up" |
|
Lower
the bar down by bending at the hips, not at the knees.
All of the movement occurs at the hip joint. The bar
should be gracing the thighs as it is lowered |
|
Keep
your knees slightly bent and your spine in a neutral
position without excessive flexion or extension. Focus
on pushing your butt back while keeping the knees stationary |
|
The
bottom position seems to resemble the start position
of a bent-over row |
|
Reverse
the motion when the bar passes below the knee joint
or when perfect form is compromised. Extend your hips
and knees simultaneously, as you would in a clean or
vertical jump |
|
Continue
to keep the back flat and elbows fully extended as you
stand up |
|
Exhale
as you near the top of the movement |
|
Pause
briefly at the top of the movement. This completes one
repetition |
4
- THE SUITCASE & THE STAIRCASE
These
2 deadlifts are simple modifications that enable greater
stress to be applied to one side of the body at a time.
The suitcase deadlift is a really well named exercise once
you picture it, but it is somewhat awkward to perform and
thus requires that you start slowly and with a light resistance.
It is truly a combination of a balancing act and incredible
strength, working every "pulling muscle, from your
hamstrings through your forearms, all the way up your lats
and traps" while putting less stress on your lower
back than the conventional style deadlift.
The
exercise provides a very similar training stimulus to the
legs and lower back as a one-leg squat, however it is superior
because it also makes demands on the pulling muscles of
the entire lifting side. Here is the step-by-step technique
for a suitcase deadlift (#8):
|
Load an Olympic bar with the appropriate weight plates.
Use an empty Olympic bar (or even a broomstick) for
your first set to develop an appreciation for the balance
demands |
|
With
the bar resting at thigh level in a squat rack, stand
sideways to the bar at approximately the mid-length
of the bar with your feet shoulder-width apart |
|
Grasp the Olympic bar with an overhand grip at approximately
the mid-way point of the bar. Make sure the bar is balanced
and let the bar hand at arm's length |
|
Keeping your upper body straight, lower yourself as
far as possible by bending your hips and knees (i.e.
squat down to the floor) |
|
As
you lower yourself towards the floor, keep your back
in a neutral position - don't bend it forward or arch
it backwards |
|
Once
at the bottom, pause, and reverse the motion by pushing
back up to the starting position with the inside leg.
That is one repetition |
|
If
that's too hard, start out by performing the exercise
with a dumbbell, and work up to a barbell |
|
Coaches
prescribe this exercise to increase side-bending abdominal
strength but as mentioned previously it is also great
for leg, forearm, and pulling strength |
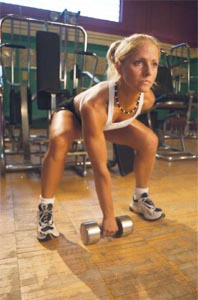
Next
up is the "One-arm Deadlift", a simplified version
of the suitcase deadlift. If you are unable to balance the
bar or adjust to the gripping demands of the suitcase deadlift,
you can start with the following exercise to begin your
progression. When you go from DB to barbell, you will only
be able to use about 70% of your DB weight due to the increased
difficulty and demand on your balance. When substituting
DB's in an exercise, you may also want to consider using
a kettlebell, rock, cinderblock, or another heavy object.
Here is a step-by-step description to the One-arm deadlift
(#9)
|
Stand
erect, with feet shoulder-width apart and hold a DB
in your right hand |
|
Bend
the knees and squat to the floor, keeping the DB close
to your side |
|
Squat
down as if you are sitting back into a chair |
|
Don't
lean forward and don't let the DB move away from the
body. You will end up leaning sideways to a small degree
|
|
Keep
the back neutral (neither rounded nor arched) |
|
Face
straight ahead in order to help balance |
|
Squat
as low as possible, pause momentarily, and then return
to the standing position by extending the knees and
hips |
The
staircase deadlift is a modification of the suitcase deadlift
and is somewhat of a more difficult exercise because it
allows the lifter to go through a greater range of motion.
The staircase deadlift is also very similar to a lateral
step-up because it is a lateral movement stressing one leg
(thus applying some stress to the groin - great for athletes).
The staircase deadlift requires a small platform (#10).
|
Stand
beside a platform with the right leg elevated on the
platform |
|
Have
a DB on floor beside you (left side) |
|
Bend
down into the squat/crouch position and grasp the DB
in your left hand |
|
Use
the elevated leg (and groin) to bring you up so that
you are standing on top of the platform. This will require
a "lateral step-up" movement to get onto platform
|
|
That
takes the Step-up "one step further" and is
tough, practical, and "functional" |
5
- MISCELLANEOUS DEADLIFT TECHNIQUES
In
order to achieve a heavier deadlift, you must strengthen
the weakest link. But until you do this, certain parts of
your deadlift (i.e. your strongest part of the lift) may
not get the training stimulus they deserve. For most people,
the hardest part of the deadlift is pulling it off the floor.
These exercises allow them to use heavier loads than normal
in their strongest parts of the lift. In contrast, for those
lifters that just can't finish the rep, these exercises
are a great way to isolate the weakness. The first of these
exercises is called the "Deadlift off blocks"
(#11).
In
this exercise, you set up as normal, and rest the weight
plates (both ends of the bar) on blocks. You can alter the
starting height as desired (anywhere from 2 inches to above
knee-level) depending on your training goal. One easy form
of blocks that can be used is a set of 45lb plates simply
laid upon the floor (rest each end of the barbell in the
middle of the plates). Use as many plates as you need to
in order to set the desire height. You can start by using
110% of the normal weight you would use in a deadlift and
progress up from there.
The
next, and very similar exercise that can be used is called
a "Power rack deadlift" or "Lockouts".
This exercise can be used with heavier loads in order to
strengthen a specific part of conventional deadlift. This
movement limits the deadlift to a specific ROM, often that
being the "lockout" (top) portion of the movement.
The "lockouts" have a specific starting point
(above the knee joint) and as with the deadlift exercise
in general, you can perform this exercise with the various
grips and stances (#12).
Have
you ever heard of the "Snatch grip deadlift"?
Whereas using a medium grip on the bar supports heavy loads
in deadlifting, the snatch (wide) grip does not. However,
by using this grip, the lifter can experience more hip flexion
and thus possibly a greater stimulus to the hip extensors
(and less of a stimulus to the quadriceps). The snatch grip
applies a great stress to the grip, upper back, and trapezius
muscles and thus should help develop more upper back strength.
So if that is your goal, this is a great exercise for you
(#13).
|
The
grip distance is established as the distance between
the outside of one shoulder to the fist of the opposite
arm when it is raise out to the side of the body and
parallel to the floor |
|
The
lifter should have the arms fully extended as in all
other deadlifts. Begin the pull from the squat position
by using leg drive |
|
Keep
the bar close to the body to reduce stress on the lower
back |
|
It
is a very difficult exercise and much will be demanded
of your upper back muscles to keep everything in place
|
Next
up is the Single-Leg deadlift. It is a great balance exercise
and could also be a supplementary exercise for an athlete's
off-season leg training (#14).
|
Stand
with your feet shoulder-width apart. Lift one foot off
the ground and support all of your bodyweight on the
other leg |
|
Bend
the knee of the leg supporting your weight slightly |
|
Bend
at the waist and slowly lower the torso towards the
floor |
|
Keep
the head up, shoulders back, chest out, and the lower
back in a flat position |
|
Do
not let the back round |
|
Limit
the range of motion of the exercise to keep the back
flat at ALL times |
|
Return to the upright position by extending at the waist
and the hips using the low-back and hamstring muscle
groups |
|
Do
what you have to in order to keep your balance |
|
Hold
light dumbbells in your hand as you progress |
For
the beginner, deadlifting with a light resistance and perfect
form is the key to success. By learning the technique, a
beginner lifter can quickly increase their poundages lifted
and thus their benefits from the exercise. While the Olympic
bar is most often used for deadlifting, the E-Z curl bar
can be a fine substitute for someone lacking in either equipment
or strength. This bar also provides the perfect design for
helping lifters keep the bar close to the body but minus
the scrapes on the shin (#15).
6
- DEADLIFTS DESIGNED SPECIFICALLY FOR GRIP STRENGTH
While
all of the versions of the deadlift will improve your grip
strength to some extent, the following two alternatives
may be slightly more efficient for reaching the specific
goal of improved grip strength. First up is the "Plate-grip
deadlift" (#16):
|
Load
an E-Z curl bar with the appropriate weight plates (i.e.
an average guy would start with a 25 lb plate on each
end). The "lip" of the weight place must be
facing out. Place the bar on the floor |
|
Squat
down into the start position (behind the bar) and grasp
the "lip" of the plate rather than the bar.
This "pinch" grip will be very tough on your
fingers to start |
|
Perform
your deadlifts like this (similar to a snatch-grip deadlift) |
|
Add
weight as desired |
The
next "grip" deadlift can be performed with a specially
made "fat" bar (larger diameter) or with a towel
or piece of PVC pipe wrapped around the bar. Training with
an oversized bar has become a top pick of strength coaches
like Matthew Jordan (Olympic Training Center in Calgary).
This should improve grip strength and forearm muscle mass
because it is much more functionally relevant than isolation
exercises such as wrist curls. To increase thickness, simply
slide a piece of PVC pipe over the bar or wrap some foam
or towels around the bar (#17).
Finally,
you may have heard of or seen the fingertip deadlift. This
exercise can be slightly dangerous due to both soreness
and the possibility of the bar slipping but is often deemed
worthwhile after consistent training, especially for athletes
or laborers that demand extreme grip strength. In this exercise,
you can perform almost any variation previously described,
but use only 2 or 3 fingers to hold onto the bar. As mentioned
previously, this exercise has costs that may outweigh the
benefits. Use with caution (#18).
So
that's it. There are probably others, but this should keep
most people busy for a while.